5G Router
Our goal is to make our products as simple as possible and for this reason we seek to simplify the installation process as much as possible.
We wanted to prepare this small installation guide to facilitate the configuration of the service once you receive our box.
When I open the box, what will I find?
Inside the box you will find the 5G device, a power adapter to USB-C, an Ethernet cable and a SIM card, although the SIM card may already be inside the device.
Getting to know your 5G equipment
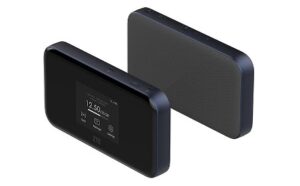
As you can see above you can find (from left to right):
- SIM tray
- External antenna connection
- On/Off button
- External antenna connection
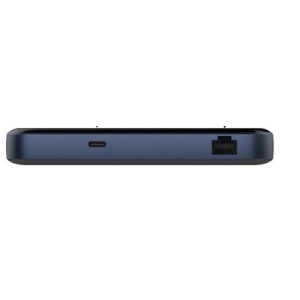
At the bottom you can see the power supply of the device via USB-C (charger supplied) and an Ethernet port for connecting equipment.
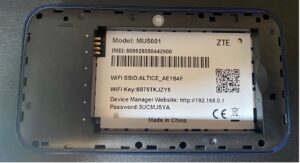
It is not mandatory but before turning on the router we recommend you to lift the back cover and remove the battery. You will see a sticker with the Wi-Fi information.
Although you can find this information in the documents you received with the package, it is always good to know where you can find this information in case it gets lost. As an example here is what you will see.
Once done, you can shut down the equipment.
The router has a battery and although it is very likely to have a minimum of charge, we recommend that you do the configuration plugged into the mains using the charger supplied.
Insert SIM card
We try to leave everything ready for you so that all you have to do is turn on your computer, but just in case, we want to explain the procedure to install it. Using a SIM card pin (or paper clip), remove the SIM card tray and insert the SIM card we have provided. Do not worry about the PIN because the card does not have one. Put the tray back in place.

Switching on the router
Everything is ready. Now all you have to do is turn it on by pressing the power button mentioned above.
Welcome!
Wifi connection
Once the router is connected, we are going to connect with our laptop, tablet or cell phone. To do this you must find the wifi created by the router (Wi-Fi SSID). In our case it is Trasgoo.com
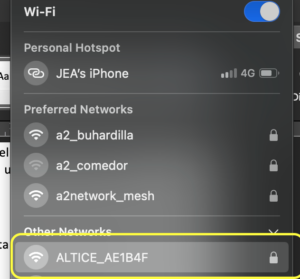
Enter the password that was written on a sticker (Wi-Fi Key: Trasgoo.com) and that’s it.
Ready to sail.
This would be enough, but as we assume that the default data that comes with the terminal will not be entirely to your liking, there are several options to modify them.
Change configuration
The router has a touch screen from which you can change everything you want and see the most important data.
It is like using a cell phone, but we believe you will find it more comfortable to do it from a laptop or tablet.
From any device, connect to the Wi-Fi we have seen before and open a browser (Chrome, Safari, Firefox, etc) and type the following address: http://192.168.0.1
You will get a page like this one: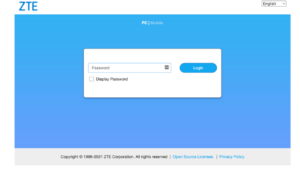
The password is the one that appeared on the sticker under the battery. In our example(Password: RouterTrasgoo). Enter this password and press ENTER.

Change Wifi name and password
From the previous screen click on the “Settings” button just below where it says Wi-Fi.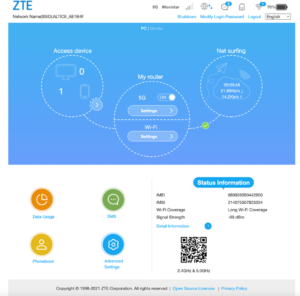
Once you have clicked there you will see the following screen appear.

In the fields , enter the name you want to give to your Wi-Fi and the password. Once finished, click on “Apply”.
Once you have done this, you need to connect your device to that new Wi-Fi you have created.
You will need to connect to the new Wi-Fi.
And you are ready to go. You can connect via Wi-Fi to the router or if you prefer you can connect a computer to the Ethernet port at the bottom of the router.
If you have also signed up for our smart Wi-Fi solution, we invite you to read on.
Intelligent Wi-Fi installation
Our smart Wi-Fi solution allows you to cover your entire home with the highest bandwidth available using SuperPods:
Installation of mobile application
The first step is to install an app on your mobile. It is available on iOS and Android. We provide you with QR codes to facilitate the download.
 |  |
Once you have downloaded it, the only thing left to do is to connect the equipment.
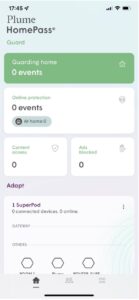
Create HomePass account

IMPORTANT: confirm that you have connected the cell phone to the Router’s Wifi.
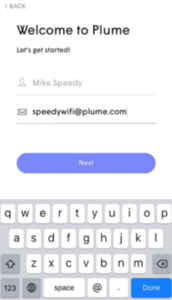 | 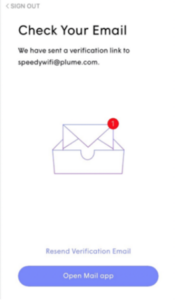 |  |
We open the application and start the registration process by registering and configuring our personal data.
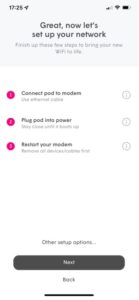
Plug in SuperPod
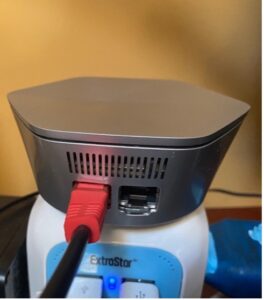
Once our account is created, we connect the SuperPod to the router using the Ethernet cable and then plug the SuperPod into the mains. Please, it is important to do it in this order.
Once that is done, we reset the router, wait for it to reboot and hit “Next” in the mobile application.
 |  |
After pressing Next, the mobile application will start searching for a nearby SuperPod.
Configure Wi-Fi
Once it has found the SuperPod it will ask us to configure the Wifi.
Here we leave it up to you to decide what you consider best, although the most convenient way is to use the same one that the router has.

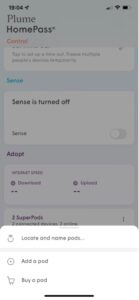
Add more SuperPods
If you have multiple SuperPods, they must be added via the mobile app.
To do so, in the mobile application you must click on the three dots as shown in the following figure.
 A menu will appear where you can select any of the available methods for adding SuperPods. The best option is to select the first one: locate and name pods.
 | 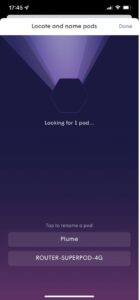 |
Once located, give the SuperPod the name you want and you can unplug it and take it wherever you want to have a Wifi network with maximum coverage.
If you have any problems setting it up, please do not hesitate to contact our customer service center.